

Companies with a high number of tickets in pending status often struggle with SLA breaches.
Over 60% of SLA violations can be traced back to poor handling of pending tickets, mainly when communication with clients or vendors is not maintained.
There is a myriad of possibilities on when to or not to use the pending statuses. The way the support team choose to use it, can make or break the relationship with clients. Support departments must keep in mind that timely resolutions are critical, and managing pending tickets effectively is a no-brainer.
When left behind, or the process of defining as pending is not that clear, these issues can lead to client frustration and dissatisfaction, which impacts a business’s reputation.
Defining when it’s appropriate to mark a ticket as pending help prevent misuse of this status, such as using it to delay work or avoid responsibility.
Awaiting client feedback, external vendor actions or parts arrival could all be valid reasons if it is accorded between parties and your support team is well-trained to use them
Remember that the ‘pending’ status in GLPI makes all SLA and date to solve to be updated after the ticket is changed to other status different from pending. So being honest and clear with clients about these reasons, can be crucial.
Tickets left in pending status for too long may increase unhappiness and missed deadlines.
Establish time limits for how long a ticket can remain in pending status before a mandatory review or follow-up is triggered. Use GLPI’s automation rules to send reminders to technicians to reassess pending tickets regularly.
Saved searches with time ranges and notifications may help technicians to not let pending status
Proper documentation within each ticket ensures that any team member can quickly understand the ticket’s history and current status, reducing delays caused by knowledge gaps.
GLPI AI plugin helps technicians to be aware of a vast timeline of facts in a ticket
Sometimes, a ticket might need to be escalated due to delays or complexity, which can further frustrate clients if not handled well.
Plugin Escalade, for example, add options of adding followups automatically when an escalation is done
Clients need and want to feel informed about the status of their tickets, even when they’re pending. Don’t let clients feel ignored.
Set up a dunning process, so GLPI may keep the user automatically updated about the status of the ticket or when you need to remind people about the need to interact with the ticket.
Twig is a templating Engine for PHP that helps to keep the code clean and organized by separating what is coded from what people see on the website. This makes the task of managing and updating templates a bit easier.
GLPI has brought since the version 10, the ability to use Twig variables on followups, tasks and solution templates. But you may ask, what is it useful for?
Well. Let's take a template you use on a daily basis and have to always change some fields. Start with a welcome message in a ticket, as an example:
Dear {Client’s Name},
Thank you for reaching out to our support team. We wanted to let you know that your support ticket has been successfully inserted into our support area. Our team is already on it and will start the process of analysis within {specified time frame}.
If you need to add any additional information or have further questions, you can simply reply to this email or visit our website at upport.yourdomain.com to update your ticket.
We appreciate your patience and will get back to you as soon as possible.
Best regards,
I know. Sometimes we forget to manually change the fields by the correct ones, or we just let general information there as don't make any mistakes.
The twig variables are exactly for this.
Every ticket has some pre-filled fields. Be it by the user, by the technicians, by automatic business rules. The only thing we want here is to be accurate, quick and informative.
Let's change this same message to add
Dear
{% for user in ticket.requesters.users %}{{ user.firstname }},{% endfor %}Thank you for reaching out to our support team. We wanted to let you know that your support ticket has been successfully inserted into our support area. Our team is already on it and will start the process of analysis within
{{ ticket.tto | date("d/m/y H:i") }}.The group
{{ group.name }}is responsible for this ticket at this level.If you need to add any additional information or have further questions, you can simply reply to this email or visit our website at upport.yourdomain.com to update your ticket.
We appreciate your patience and will get back to you as soon as possible.
Best regards,
As you can see, there are some variables in this template. It means that every time a technician selects this Followup template, GLPI will insert:
{% for user in ticket.requesters.users %} {{ user.firstname }} , {% endfor %}{{ ticket.tto | date("d/m/y H:i") }}{{ group.name }}The best part is that, once these fields change during the lifecycle of the ticket, the new followups, tasks and solutions will get updated information to be inserted during the time.
Here are some other ideas of templates you may use
{{ knowbaseitem.answer | raw }}
{% for user in ticket.requesters.users %}{{ user.fullname }}{% endfor %}
There is a possible article on our knowledge base that may be of help:{% for knowbaseitem in ticket.knowbaseitems %}
{{ knowbaseitem.link | raw }}{{ knowbaseitem.answer | raw }}{% endfor %}
Hi
{% for user in ticket.requesters.users %}{{ user.firstname }},{% endfor %}Hope you're doing well! We're just dropping a quick note to remind you that your response is needed to proceed with ticket #
{{ ticket.id }}regarding{{ ticket.name }}.Your input is crucial for us to move forward. If you could spare a few moments to provide the necessary information or feedback, we'd greatly appreciate it.
If the issue has already been resolved, or you have other questions, please let us know.
Thanks for your attention to this matter!
Best,
{% for user in ticket.assignees.users %}{{ user.firstname }}{% endfor %}
The Twig variables may be found at the followup, task and solution templates. Explore it and make me know what are the projects you have created with them. We will have news about those same twigs in next versions.
In a fast-paced routine, losing important news and updates is not a rare incident. Analysts do have a lot to do during their day, and the world doesn't stop. It's hard to keep up with everything.
Sometimes, leaders may want their teams to be aware of information from some service providers that maintain blogs and pages where useful announcements are inserted. I, Arthur, in the past, used to have three products on my portfolio that used to publish new features announcements, dates of future updates and also notices and alerts about their tools.
I always wanted — and still want — to be aware of what is going on and coming on the next months when the main tools I use have this channel available.
These blogs usually have a service called RSS — Really Simple Syndication — which is a very convenient way to receive updates from your favorite websites without having to visit them manually.
There are several options of RSS Feed Readers. But, adding a new layer of complexity to your daily basis could not be the best approach. GLPI has this tool embedded with the adding of you being able to share some sources of information to Entities, Groups, Users, and Profiles. You add the feed to your instance, and GLPI works as an RSS Feed Reader that may be the official source of information for you and your teams.
https://faq.teclib.com/03_knowledgebase/tools/rssfeed/
https://glpi-user-documentation.readthedocs.io/fr/latest/modules/tools/rssfeed.html
GLPI has categories, types, and other kinds of options to categorize and split related objects into groups. Imagine you could gather different objects that have any relation. Be it a project, a client, a group of clients, a status, or even expand the possibilities of categorizing objects inside their already created categorization.
That's what the plugin Tags does.
It is exactly as, in a physical environment, labeling things to make sure that on a first look, we know that this object is part of something else.
Business rules integration: one of the standout features of the tag management plugin is its ability to integrate tags with business rules for tickets. This means that tags can be added to tickets based on pre-defined criteria.
Permission controls: to prevent an overload of unnecessary tags, the plugin offers essential permission settings. These settings ensure that only authorized personnel, typically administrators, can create and manage tags. This level of control helps maintain a clean and orderly tag system, preventing misuse and clutter that could complicate asset and ticket management.
Administrative control: the focus on administrative control within the tag management system ensures that tags are created in a structured and thoughtful manner. By centralizing tag creation and management, GLPI ensures that the tagging system remains an effective tool for organization and doesn’t become a source of confusion. There is also the ability to add colors to tags, so it becomes easier to find groups at first sight.
The practicality of the tag management plugin shines across various applications within GLPI. Here are a few examples:
These applications demonstrate the versatility and utility of the tag management system in everyday scenarios, making it an essential tool for any GLPI user.
There are also some unusual ways of using the Tags plugin. The administrator's creativity is the limit.
The Tags plugin is a powerful extra resource to GLPI, offering significant improvements in efficiency and organization. By utilizing this tool, service departments may ensure that their resources are used effectively, and that information is always at their fingertips, and with fewer clicks.
Have you discovered any unique uses for tags in your environment?
https://faq.teclib.com/04_Plugins/Tags/
https://glpi-plugins.readthedocs.io/en/latest/tag/index.html
In the dynamic world of IT asset management, maintaining accurate and efficient control over asset allocation is crucial. GLPI, an open-source IT Asset Management system, provides a powerful and comprehensive solution to manage a vast array of assets. From hardware to software inventories to networking equipment.
When looking for efficiency, an effortless and reliable asset management process is crucial for maintaining operational data up-to date, laying the foundation for strategic planning.
Manual asset transfers and update are one of the most faced challenges within an organization that starts the CMDB processes. The process, inherently prone to human error, can lead to inaccuracies in data, misallocations, and administrative overhead. It means costs and less perception of value to the company. Not to mention the time consumed from the people responsible to assure the inventory is correctly updated.
Automating asset transfer in GLPI not only saves time but also ensures a more efficient and error-free management process. By leveraging business rules, you can ensure that computers, software licenses, and monitors are always optimally allocated, improving overall productivity and resource utilization.
05:50 - Remote Inventory Toolbox video card - https://www.youtube.com/watch?v=mM45fIim-SY
GLPI Rules - https://faq.teclib.com/02_FAQ/Rules/
GLPI Agent Toolbox - https://www.youtube.com/watch?v=xNfqKTp9LN8
What's the difference between GLPI Inventory, the plugin and the toolbox - https://www.youtube.com/watch?v=5qohDUvhCAI
00:00 - Why and when should I transfer assets between entities on GLPI?
01:30 - Manual transferring of assets between entities
02:47 - Rules for assigning an item to an entity
05:44 - Automatic transferring of assets between entities
07:34 - Extra tips for asset management
Every service change or incident may cause disruptions in organizations, and understanding the ripple effects of these possibilities is crucial for maintaining stability, efficiency, and continuity.
Impact analysis emerges as a pivotal process, enabling organizations to foresee and mitigate potential interferences. A comprehensive ITSM tool with the possibility to visualize and manage effectively the impact analysis is key for a compliance team.
Understanding Impact Analysis
Impact analysis is a critical ITSM process aimed at identifying the potential consequences of proposed changes or unforeseen incidents on business operations and IT services. It involves assessing the severity, extent, and repercussions of these changes or incidents, helping organizations prioritize actions and allocate resources efficiently. By conducting thorough impact analysis, businesses can ensure that their IT infrastructure remains resilient, responsive, and aligned with their strategic objectives.
GLPI as an open-source software tool designed for inventory management, issue tracking, and comprehensive Information Technology Service Management, provides a robust platform to manage assets from small to huge companies, including hardware, software, networking equipment, and devices of all kinds, facilitating the correlation between incidents, problems and change management processes.
Leveraging GLPI for Impact Analysis
GLPI's asset management functionality serves as a foundation for effective impact analysis. After a detailed inventory of IT and non-IT assets is performed, GLPI allows organizations to map out the interdependencies between assets.
This visibility is important and crucial, not just to understand how far an incident can go, but also to assess how a service change, or problem can affect the whole company and services, for example.
Using GLPI, companies are able to:
The incident management capabilities of GLPI enable organizations to log, track, and manage incidents efficiently. After the inventory collecting and data updating, analysts may create the dependencies between the assets and make sure everyone knows which assets may be affected when an incident occurs to one of these assets.
Furthermore, when discussing incident management and its impact on environments, IT teams should never forget about changes that usually need to be made in networking and servers. Every system that needs a new feature, workflow or upgrade, for example, can bring positive or negative impact for the running state of a company, so impact analysis is not just useful for incidents. But also for change management.
Change management is also a crucial process for planning and implementing changes systematically. Any company that aims to ensure that changes are being made with a clear understanding of risks and advantages must have documentation of proposed changes, scopes, potential impacts, checklists, and roll-back plans.
GLPI Asset management et Change Management modules, alongside Impact Analysis feature may deliver tools for small or big teams to create committees and discuss actions with clear information about expected positive and negative impacts
Imagine a scenario where the Rack 1 is down due to any reason — let's say the uplink from Switch A3 et Rack 1 is down.

Any technical analyst knowing the team is working to make sure this uplink is reestablished as soon as possible may have the information that any user reporting incidents directed to any of the services hosted on SRV-GLPI will have the same ‘root cause’ — Rack 1 and Switch A3 uplink down.
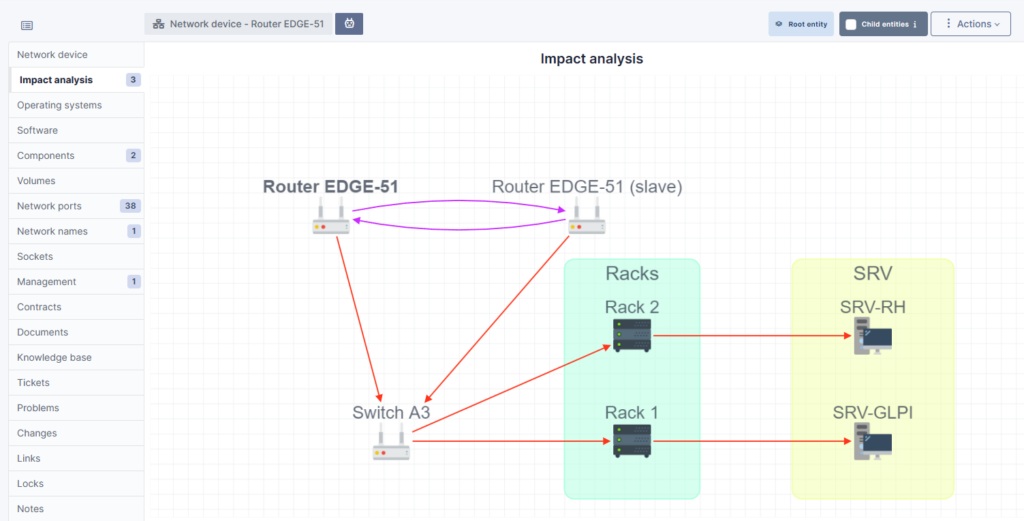
And when I talk about perspectives, look at the image above:
When we look at the same topology from the perspective of the Router EDGE-51, any incident or change on any of the Routers will have impact at the whole network. But not just the network, but also on the Router EDGE-51 (slave). These two are dependent on each other. It does not mean that if one fails, the other will fail too.
The purple arrows mean that they are dependent on each other and that they would both be affected if one of them were to encounter a problem. They are therefore both dependent and impacted.
You can find more documentation here.
Best Practices for Impact Analysis with GLPI
To maximize the benefits of GLPI for impact analysis, consider the following best practices:
Impact analysis is essential for navigating the complexities of modern environments. By leveraging GLPI, organizations can gain a comprehensive understanding of the potential impacts of changes and incidents on their operations. This insight tool enables informed decision-making, efficient resource allocation, and enhanced service resilience. As GLPI continues to evolve, its role in facilitating it.
Resources
We're excited to announce the release of our latest video tutorial showcasing the installation of GLPI 10 on Ubuntu 22.04 LTS!
This tutorial aims to simplify the installation process for users looking to deploy GLPI on their on-premises Ubuntu servers.
In this video, we provide a comprehensive guide on setting up GLPI, covering each step from preparing your Ubuntu environment to configuring the software via its web interface. Whether you're a seasoned IT professional or just starting with GLPI, our tutorial offers valuable insights and best practices to ensure a smooth installation process.
To complement the video tutorial, we've compiled a detailed written guide with step-by-step instructions available on our new FAQ page. You can find the instructions referenced in the video below, enabling you to reproduce the installation steps at your own pace.
We believe this content will be immensely beneficial to the GLPI community and anyone interested in implementing a robust IT service management solution. Stay tuned for more tutorials and insights on optimizing your IT infrastructure with GLPI and subscribe to our YouTube Channel
Watch the GLPI 10 Installation Video Tutorial Now!
Happy installing!
https://glpi-install.readthedocs.io/en/latest/prerequisites.html
https://faq.teclib.com/03_knowledgebase/procedures/install_glpi/
In the fast-paced world of technology, managing user identities across multiple platforms can be a daunting task. Imagine a typical day at work, where you’re juggling access to a myriad of systems – from email and intranet to various tools like GLPI, ERP, and CRM. Each time your role changes, or you update your profile – or some other user’s does on theirs – someone from the IT department is burdened with the tedious task of manually updating these details in every system. Not to mention the need of managing multiple passwords for the vast diversity of systems you use on a daily basis. This method is not only time-consuming but also riddled with potential errors.
Now, think of SCIM – or System for Cross-domain Identity Management – as a versatile “translator”, a proactive “messenger”, or an efficient “negotiator” in the digital realm, that streamlines communication between different systems. Instead of someone having to manually go to each system to update your information, SCIM automates this process. When there's a change in a user's information, SCIM automatically spreads these updates to all connected systems.
So, SCIM helps companies to efficiently manage user identity information across various systems, saving time, reducing errors, and enhancing security. It's like having an assistant ensuring that all your information is consistent everywhere, without the need for constant manual intervention.
It’s common to mistake OAuth capabilities for data synchronization, especially in GLPI instances and User and Groups Directories. While OAuth does provide centralized and secure access permissions, SCIM and OAuth serve distinct purposes, despite their apparent similarities.
Both plugins, when integrated with other credential systems, facilitate access without risking exposure to LDAP infrastructures or complex VPN setups — a critical advantage, mainly for GLPI Cloud Network users connected to Azure Active Directory (Microsoft Entra ID).
SCIM plugin simplifies the management of user information, and depending on the provider, also credentials. Attributes like name, email, roles, and contact information are part of its scope of management and synchronization. It standardizes the way identity information is exchanged between identity providers and service providers without excessive exposition of applications and using secured and trackable API channels between services.
One great use case is to have users using their Azure Active Directory (Microsoft Entra ID) information on a GLPI instance. In addition to OAuthSSO plugin, the credentials are also the same — and the users don’t need to authenticate again if they are already connected to their browsers.
For GLPI Cloud Network customers and those with a GLPI Network Basic (or higher) subscription in an on-premises environment, these plugins offer an unprecedented level of convenience and security in identity management.
How to set up the SCIM plugin with Azure Portal
How to set up the SCIM plugin with Okta
How to set up the OAuth plugin to log in to GLPI using Microsoft 365 credentials
https://services.glpi-network.com/documentation/1565/file/README.md
If you’ve ever wanted to give your GLPI instance a unique touch by incorporating your logo and customizing the login page, you’re in for a treat. In this blog post and accompanying video tutorial, let’s walk through the first steps of using the Branding Plugin to elevate your GLPI experience — and your client’s too.
The Branding Plugin for GLPI is a powerful tool designed to enhance the visual appeal of your GLPI instance. It allows you to replace default logos with your own and create a more personalized login page without the need of copying and pasting files directly into the server’s folders.
This not only makes your GLPI instance visually distinctive, but also reinforces your organization’s brand identity.
ℹ️ The ‘Branding’ plugin is available for all the Basic GLPI Network subscribers and for all GLPI Network Cloud customers.
If you are, at least, a Basic GLPI Network Subscriber or a GLPI Cloud Network administrator, you can find the plugin named Branding on the Marketplace of your instance.
✅ The plugin is available for all Basic or above GLPI Network Subscribers and for all GLPI Network Cloud clients.
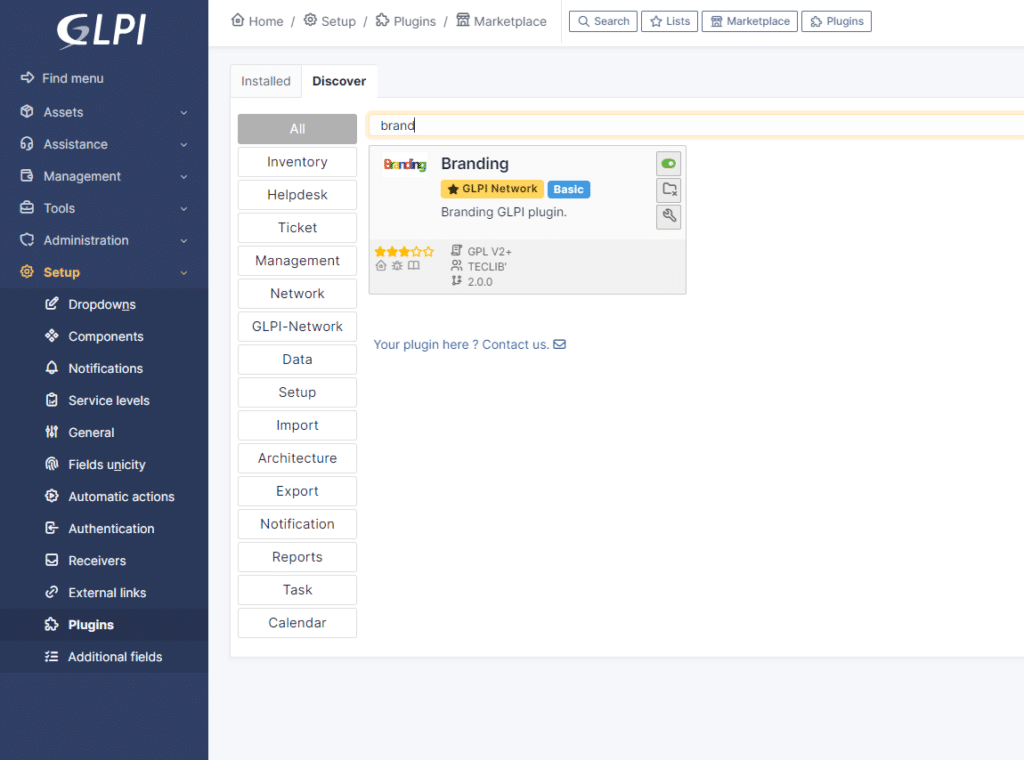
Step 1: In Setup > Plugins > Marketplace, search for Branding after choosing the Discover tab.
Step 2: Install and enable it.
Step 3: Click on the tool icon below the Uninstall button or navigate through Administration > Entities > Root entity and look for the Branding tab

Step 4: Choose the files you want to replace the current ones.
Getting started with "Branding" is easy. You'll find detailed documentation here: Plugin Documentation. Plus, you can explore this plugin in action on your GLPI Network Cloud demo instance.
This plugin is available via our professional offers ! From the level “Basic” in GLPI Network Subscriptions (on-premise), and to all of our GLPI Network Cloud customers.
Find all the details about our subscription offers in this brochure: Subscription Brochure. For more information on GLPI Network Cloud, visit our site.
This plugin isn't just a tool; it's a community effort. We invite you to test it, provide feedback, and help us refine it to better serve your needs.
Stay connected, stay informed, and elevate your work experience with the "Branding" plugin. We're here to make sure you're always in the loop, no matter where your work takes you.
00:00 Intro
00:31 Installing the 'Branding' Plugin
01:23 Setting up the 'Branding' Plugin
03:47 How to set up a different branding to different entities
Provide support to companies or branch offices worldwide can be a big challenge if you need to comply with everyone to keep on just one language.
I used to be a language teacher and, myself, am not an English native speaker. It can be hard to express some ideas, feelings and describe issues or requirements when you’re not using your own language.
Translation tools happen to be some kind of best friends when you need support from companies around the world. Or even when you support companies or offices that keep sending you tickets in other languages that you can’t understand.
Communication is more than just convey a message. It’s about really understanding what you want to be perceived by your pairs.
With our new plugin called “Translate”, part of the job of copying and pasting texts to add tasks and follow-ups is gone.
With Translate you can add the ability to translate ticket timeline items like tasks and follow-ups.
GLPI is a multi-language ITSM tool, which means that you can provide system translation on menus, modules, notifications, categories taking into account the language that each user selects on their personal settings. The only missing piece of information that would not be translated were the written items. The ones that people provide to the system.
The plugin is available to all GLPI Network Basic Subscription and GLPI Network Cloud clients, and it is integrated with the Translation API from DeepL, a leading neural machine translation service that uses artificial intelligence to provide high-quality language translation.
Which means you will also have a DeepL account and registration on its Translation API — which has many plans, including a free tier.
Video content
00:00 - Multilingual support is hard
01:07 - Plugin Translate
01:48 - How to configure the plugin Translate
02:58 - Plugin Translate Demonstration
04:40 - Plugin Translate permissions