

CloudInventory allows automatic and manual synchronization of resources hosted by various cloud providers (OVH, AWS, Azure, Google Cloud, etc.) into GLPI. It supports real-time discovery, cron task scheduling, API data visualization, reconciliation with GLPI assets, a summary dashboard, and integration with asset management rules.
Compatible with GLPI’s dynamic inventory via the agent, this plugin promotes centralized and consistent management of your hybrid infrastructure.
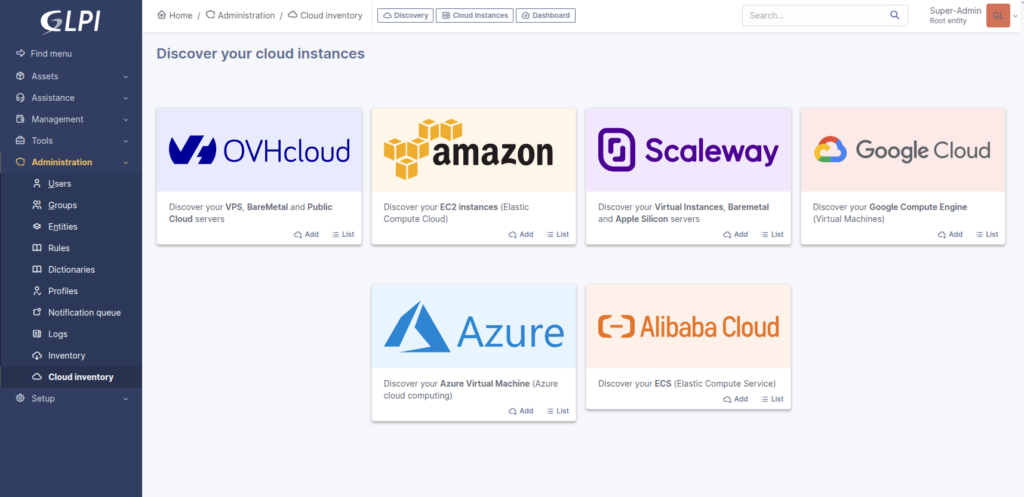
Discover the plugin at this link: https://plugins.glpi-project.org/#/plugin/cloudinventory
Explore all its benefits in the documentation: https://glpi-plugins.readthedocs.io/fr/latest/cloudinventory/index.html
We would like to announce a new exclusive GLPI Network plugin — GLPI-AI — Available at https://plugins.glpi-project.org/#/plugin/glpiai. It is now available for clients with a GLPI Network subscription (Basic, Standard, Advanced) and PHP version >= 8.1, and starting from April 22nd for all GLPI Cloud instances.
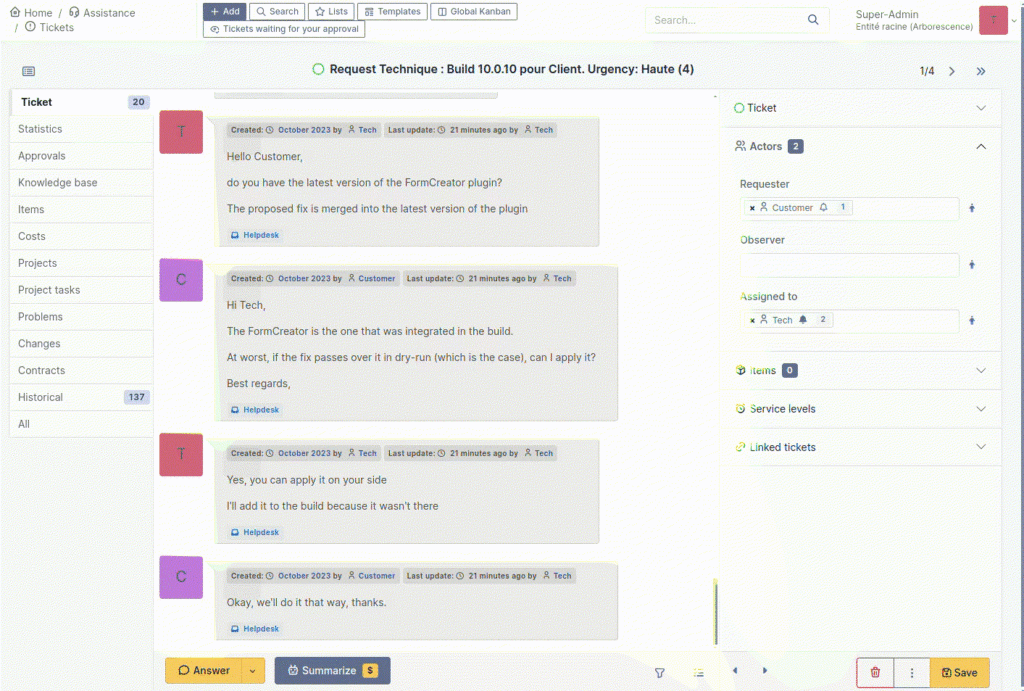
This plugin adds the ability to summarize the timeline items of tickets using the Open AI API.
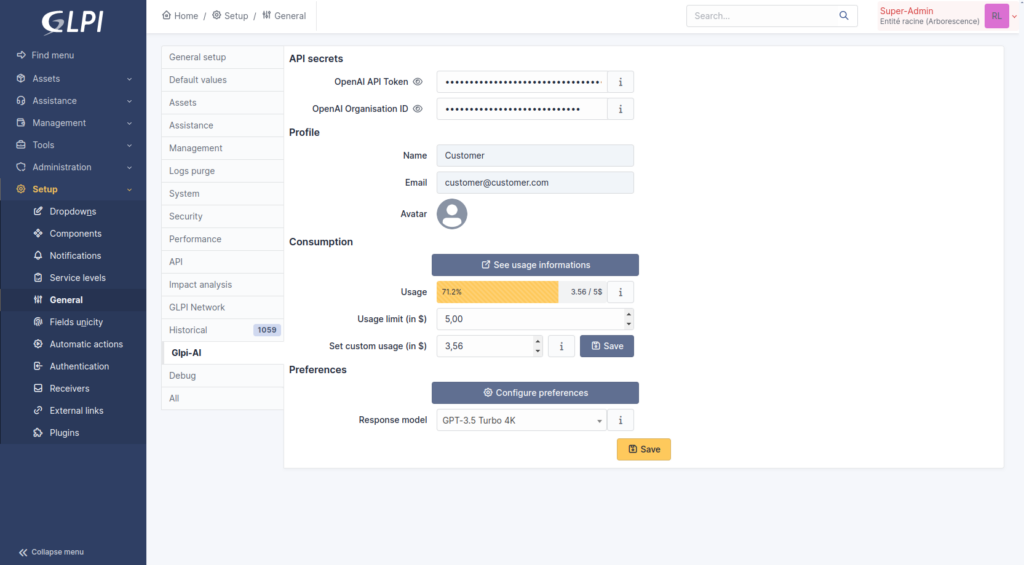
Find the documentation here: https://services.glpi-network.com/documentation/1864/file/README.md
View our brochure to find out more : https://glpi-project.org/wp-content/uploads/EN.pdf
GLPI AI is building on OpenAI

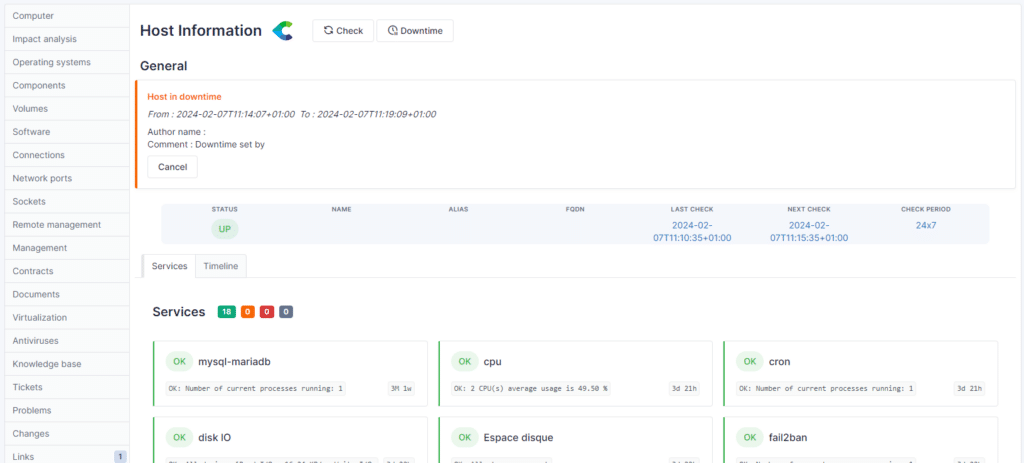
We would like to announce a new plugin — Centreon— available to all GLPI Network Cloud customers and for everyone with a marketplace registered (free tiers) !
The git repository is also open to everyone : https://github.com/pluginsGLPI/centreon
The plugin use the Centreon API to retrieve informations about hosts and display them in corresponding computers (matching the name).
The tab shows services informations with their statuses, and a timeline of events.
You can also send a few actions to the distant server like:
This is the first version of the plugin and we will continue to work on it and deliver more features (metrics, widgets for our dashboards, listing of all services, etc) soon.
Important announcement for the GLPI community regarding our GLPI Network Cloud offerings! We have decided to streamline our GLPI Network Cloud offers!
⚠️ GLPI Network Public Cloud remains unchanged (starting from 1 user, €19/user/month).
⚠️ Private Basic Cloud is now "Private Cloud" (starting from 25 users, €21/user/month).
⚠️ We no longer offer Private Advanced Cloud! Please contact us for a customized solution if you have more than 100 users!
We invite you to check out our new offers on our official GLPI Network Cloud website: https://glpi-network.cloud/prices/
For any questions or if you need a customized quote, feel free to contact us!
Collecting inventory data from servers, network devices, and workstations across your company is a challenging task. Initially, this process requires installing agents on every computer. However, there are common obstacles. Perhaps internal policies prevent agents from being installed on all servers, or there's no centralized installation method. Sometimes, networks are isolated, making it impossible to connect to your GLPI server, or you might simply need to collect data remotely from your network.
Additionally, consider the scenario where data collection is necessary from network devices and printers. This is where the GLPI Agent becomes invaluable. Since its 1.6 version, the GLPI Agent includes a Toolbox plugin. This plugin significantly expands your capabilities, allowing for network discovery and inventory of network devices using SNMP. It also facilitates remote data collection of hosts: Windows through WinRM, Linux via SSH, and ESXi.The beauty of the GLPI Agent lies in its versatility - all these functions are integrated into a single agent, simplifying what was once a complex and multifaceted task.All you need before starting is:
a. If you have many VLANs or want to segment the scans between tasks, you can separate the ranges following your company policies4. The list of SSH, WinRM and SNMP credentials with administration permissionsThe toolbox is not intended to be installed on insecure networks.
After we've gathered all this information, You can follow these steps contained in the video below:
a. You will need just the 4 menus that are on the documentation:i. Credentialsii. Inventoryiii. IP Rangesiv. Scheduling3. Create the IP ranges you want to discover and inventory devices remotely4. Register the SNMP credentials of your devices5. Register the SSH credentials of your devices6. Register the ESXi credentials - if you have them7. Create the scheduling you want GLPI Agent to run - if you want to do it recurrentlya. Even if you want the task to be run just once, we must create a schedule to add to the task8. Create an Inventory taska. If you set a huge network, you need to be aware that more time will be needed for the agent to finish its job.b. threads is the number of remote devices the task will query for at the same time.i. This can be set higher to make more requests at the same time and keep the task running in a shorter time.ii. The value must be reasonable, and the right value can depend on the resources allocated to the agent.c. timeout is the number of seconds before the agent will decide a remote device is not responding.i. On a local network with devices responding quickly, it can probably be set to 1 second.ii. On devices located behind a far network or if devices can be overloaded, this may require a higher value.iii. When have SSH authentication is included, 10s is better, so the agent can wait for the device to respond.9. Run the taska. If you activate the debug of the agent to the ID 2, which is the most complete debug mode, you will be able to watch each tentative of the agent to connect to each IP of the range.In this scenario, we are collecting just information about SNMP equipments, and Linux instances using SSH. For this lab and video, we are not collecting Windows information, even though it is possible if you enable WinRM connections from the host containing the GLPI Agent Toolbox and registering a WinRM credential to the configuration of the agent.
https://glpi-agent.readthedocs.io/en/latest/tasks/remote-inventory.htmlhttps://glpi-agent.readthedocs.io/en/latest/plugins/basic-authentication-server-plugin.htmlhttps://glpi-agent.readthedocs.io/en/latest/plugins/ssl-server-plugin.htmlhttps://glpi-agent.readthedocs.io/en/latest/plugins/toolbox-plugin.html#setupGLPI Agent Toolbox
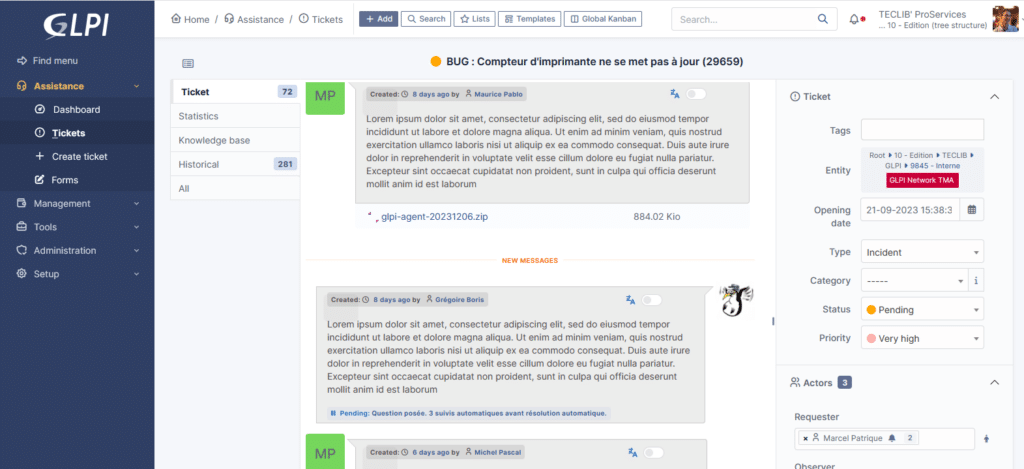
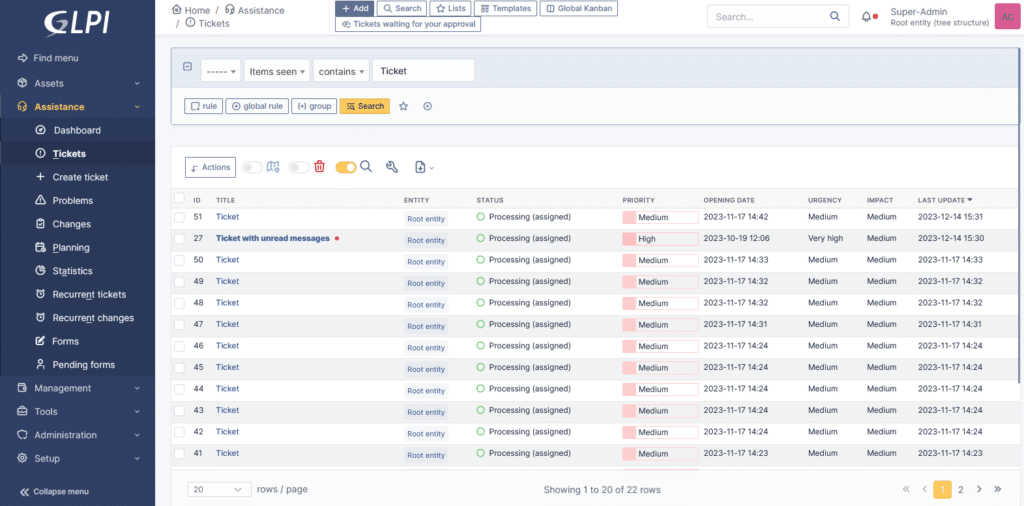
We would like to announce a new plugin — Unread — available to all GLPI Network Cloud customers and via our professional offers starting on the Basic GLPI Network Subscription (on-premises) and above !
This plugin helps you to keep track of unread messages while you were offline and don’t want to miss ant messages that could have be sent, and you should be aware of.
The plugin adds a new notification bell in the top right corner so you can keep track of everything you need to. This notification bell list all your unread messages.
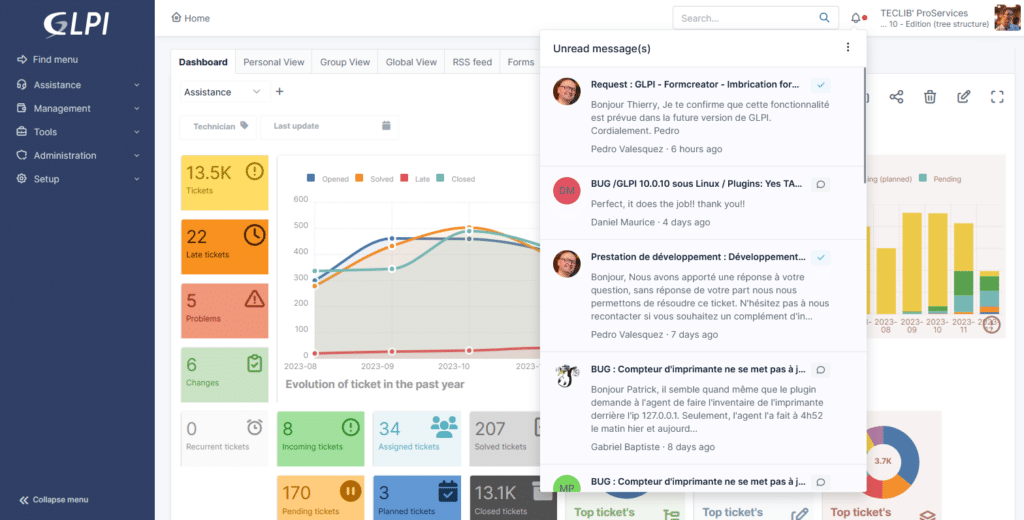
The timeline indicator adds a line below the last item you have read on THE tickets’ timeline. So now it’s possible to come back to work knowing exactly where you stopped before.
When you open the ticket list, all the tickets with unread messages are highlighted, and you can choose the one you want to know more about.
Find the subscription brochure here: https://glpi-project.org/wp-content/uploads/EN.pdf
On GLPI Network Cloud: https://glpi-network.cloud/
Documentation for this plugin can be found by clicking this link: https://plugins.glpi-project.org/#/plugin/unread
You can test this plugin (and all other GLPI Network plugins) on your GLPI Network Cloud demo instance.
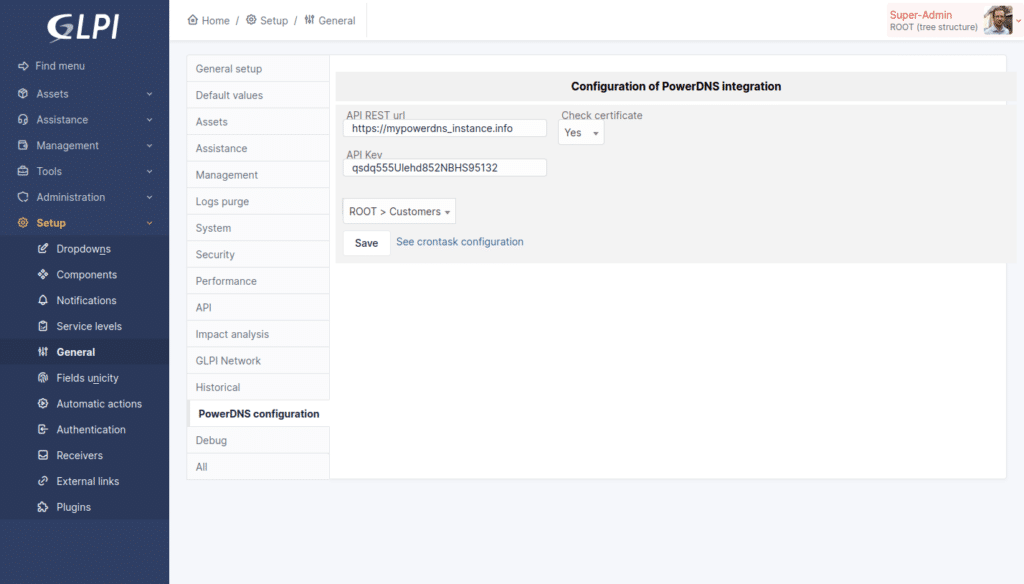
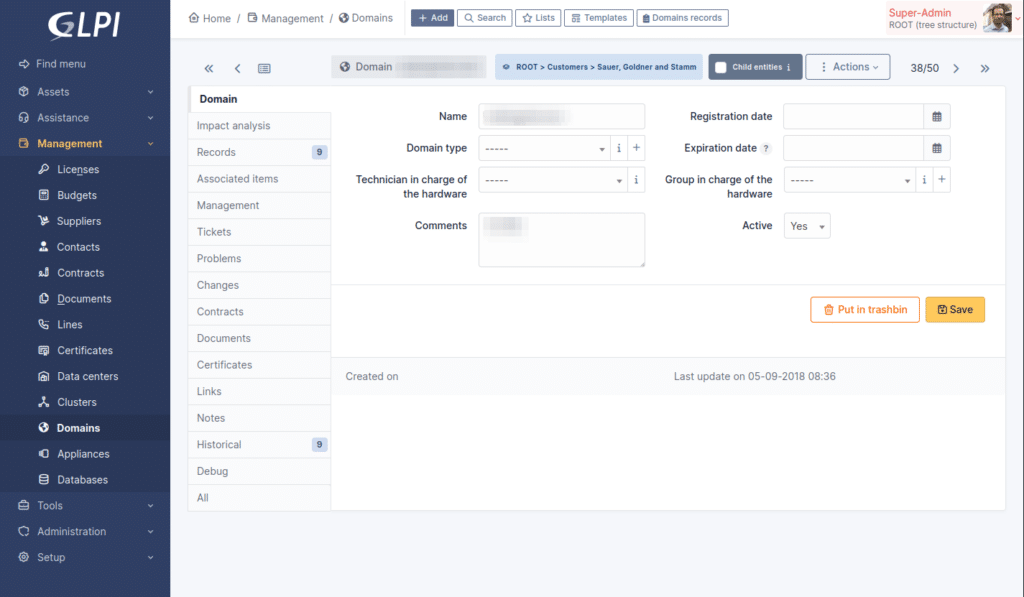
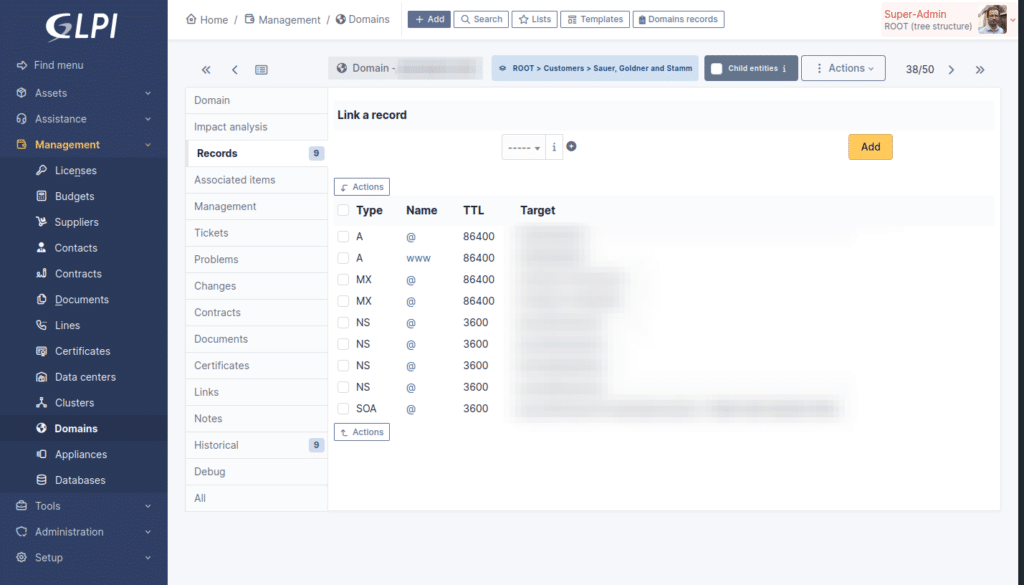
We would like to announce a new plugin - PowerDNS - available via our professional offers ! From the level “Basic” in GLPI Network Subscriptions (on-premise):
Plugin Features:
Import and manage domains/records from and to PowerDNS by using GLPI interface. We use PowerDNS API to retrieve these objects and insert them in the corresponding GLPI tables.
On plugin first installation and when configuration is done, we import all domains and records from PowerDNS to GLPI. Then, we keep them synchronized with the help of a GLPI crontask.
More, every actions done on GLPI side on related objects will be replicated on PowerDNS side. Domains deleted or updated, records deleted or updated, etc.
Screenshots:
Find the subscription brochure here: https://glpi-project.org/wp-content/uploads/EN.pdf
On GLPI Network Cloud: https://glpi-network.cloud/
Documentation for this plugin can be found by clicking this link: https://plugins.glpi-project.org/#/plugin/powerdns
You can test this plugin (and all other GLPI Network plugins) on your GLPI Network Cloud demo instance.
Kind regards,
Dear GLPI Community!
We would like to announce that official support for GLPI 9.5.x will be discontinued on 30.06.2023. Starting from the 1st of July 2023 (3 years after the first launch of this version) we will have to say goodbye - there will be no new releases 9.5.x.
It is mandatory to migrate to GLPI 10.0.x in order to be covered by official support.
How-to MIGRATE:
—OPTION 1: You can do the migration via official partners-integrators (if you have a valid GLPI Network Subscription); or
—OPTION 2: If you choose GLPI Network Cloud, we offer a free data migration from on-premise for everyone.
We ask you to communicate the upcoming changes to your customers and finish migrations before 30.06.2023.
Thank you!
The presentation is hosted by Alexandre Delaunay, in charge of the GLPI development team and the product owner for GLPI.
In this video he talks about roadmap and some features development team wants in GLPI for the next major version. Here is the transcription:
“To keep the presentation short, we will discuss only about:
- Major topics
- Or very graphical ones
And I would like to insist on the fact that there is no promises of time regarding the delivery.
We will try our best to add the features, but in function of how the year will go, some will be OK, others not.
Now, we have in our marketplace 2 plugins to address generic adds:
- Genericobject
- Fields
We want to add the possibility to let you customize each type of objects displayed in the Assets menu (at first).
The first part of that is to let you define your types.
We will provide a list of predefined types matching the current assets list and let you add new ones if you want. Like servers in addition to desktop or laptop computers. Or to do something completely different from IT management, e.g: cars, desks, etc.
Some of the current types will still be not removable like Software, Rack, Cable, Cartridge and Consumable. The reason is their behavior, or their presentation differs from other assets.
You will still be able to disable these if you want but deletion will be impossible.
So, GENERICITY covers the creation of new asset types.
In addition, on the same setup page, you will be able to define which capacity an asset type use.
E.g. contracts, management, etc., COMPOSITION of an asset type, with some checkboxes to select capacities.
This permits you to remove or add tabs to the object.
Or if an object can be inventoried by an agent.
Let us talk a little about features related to the GLPI inventory agent.
Remote inventory reminder.
Before talking about roadmap, let us do a quick reminder about remote inventory feature
This is a task you can set up for an agent to let it query other computers on your network to construct an inventory file for each.
The single agent will aggregate all inventory files and send them in one pass to the inventory API of GLPI.
So, the main purpose is to have only one deployed agent.
We use SSH and WinRM protocols to achieve that.
GLPI Agent - Roadmap (1/2).
The first point we want to improve is to ease the inventory process of your network.
We currently have two tasks:
- discover which "ping" addresses in an IP range
- network inventory, which takes the result of the discovery to do a full SNMP inventory for network equipment and printers.
We will change the process, by:
- adding remote inventory of COMPUTERS
- and let discovery task directly doing a FULL inventory if it knows the type of the remote device. A SNMP query for network equipment, SSH or WinRm queries for computers.
With one unified task and one setup, we aim to let you discover all your network devices.
The two last bullet points describe things required by unified discovery. The new toolbox UI will receive forms:
- to plan tasks for the agent.
- to save credentials, like SNMP community, login password couple for Windows domain or public key for a SSH connection. In summary, any information to let the agent connect to a remote device.
GLPI Agent - Roadmap (2/2)
We thought about rewriting a large part of the agents, and we shortlisted Golang for that.
The fact the agent is written with the language PERL.
Recently, finding developers comfortable with this language has been hard.
We will try a prototype within the year to measure our capacity to switch to this new language.
We plan also to enforce exchange between agents and backend by adding authentication and registration flows. This will be recommended but you will be able to do simple exchanges if you prefer.
And we still need to redo all forms to drive remotely the agent in GLPI UI.
This is still planned.
Let us talk a bit about features related to the GLPI web application.
High-level API (1/2)
Firstly, we will add a new API, again.
We observe that, despite the old one permits more usage, due to its low-level connection with the framework, it is hard to maintain its stability and avoid regression.
We maintain an interface to address depreciation for this previous API, but it is getting harder and harder to do.
So, a new API connected to a higher level with stabilized endpoints and parameters.
And we took advantage to add some comfort features:
- we have a dedicated UI based on Swagger UI to ease discovering and testing endpoints and their parameters
- we also use RSQL, a common Query language for filtering API.
High-level API (2/2)
For the second slide, you can see in action a GET request to list users in GLPI database.
We want to extend the datacenter features in the next version. Mainly about adding graphical views.
DCIM - Network equipment's panels
The first and the simpler one is graphical panel for network ports list in equipment forms.
We will take the front and rear pictures defined in the model of the equipment and display them above the ports list.
The user will get information about each port directly on the picture panel by hovering them.
A single click on a port will scroll the page to the good line to get more information.
In the model setup, you will have a new tab to draw each port's position.
DCIM - Graphical enclosures (1/2)
In the same way, slots of an enclosure can be drawn and indexed to indicate to GLPI where sub items can be placed.
DCIM - Graphical enclosures (2/2)
On a rack view where an enclosure is inserted, instead of a single blank rectangle, slots will be displayed and usual controls available, like hovering or clicking to get more information.
DCIM - Graphical connections
Finally, for DCIM part, we will try to add some representation for network or power connections.
The goal is to get links between equipment.
This is early to talk about this, we have short specifications for this, and it requires more research to find a library, for example.
Keep in mind the current screenshot does not represent any existing development.
Workflows - Processes
We have a functional prototype for this.
A new view to let GLPI administrator's set up their business processes.
With steps, transitions, conditions and actions, a full toolkit to describe a full workflow.
This aims to replace legacy rules.
And for a start, it will be available for assistance objects like tickets or change.
Nutanix inventory import
Another development currently in alpha is the connector to Nutanix API to get:
- Clusters
- Hosts
- Virtual machines
- Disks
The module parses the distant API and sends them to the native inventory API of GLPI.
The merger with existing devices is done with the rule engine as usual.
SCIM
Another connector, GLPI will serve a SCIM endpoint for your Microsoft Azure instance.
This protocol pushes changes of users from the directory to connected application.
So instead of synchronizing the whole user's database and matching everyone, any change in the directory will be immediately pushed to GLPI.
Now, a security feature, two factors authentication!
Administrators can enforce users' logins in the security setup to ask them to register an external application like Google Authenticator or Authy.
Security - 2 factors (2/2)
After a successful login, a new field will appear asking users to paste a pin code from the authentication application.
Security - Oauth Server
We will add an Oauth server to GLPI for 2 purposes:
- connect applications to GLPI to delegate the login feature and identity management
- secure our several API like inventory one or the general purpose one.
Security - misc
- Vulnerabilities management
- Scanners integration (vuls, tsunamin)
- CVE matching
Some various points:
In the management menu, a new entry to list vulnerabilities.
The goal is, with the help of external scanners, like vuls or tsnunamin, as well as some API to get CVE and match them to known software's to see if a host has some security vulnerabilities.
Some dashboard cards and alerts will also be added to enhance reporting about this subject.
Technical changes
- Web root for the application will be `/public`
- continue work on twig (removing legacy echo)
- removal of legacy auto escaping
- modularization of critical features
- e-charts lib for dashboards
Last slide to tell you we continue to improve the core of GLPI.
The most impactful for you will be the move of the web root of the application.
Now, it will be a sub-folder named /public.
Thereby, all other sub-folders (like files for example) will not be available on the web when the webserver is not well set up.
The next point is legacy codebase we need to clean.
And to finish, we moved to a new charting library called e-charts.
It is simpler to use on our side and you appreciate the new colors and its interactivity.
Timeline?
- Currently, finish stabilize 10.0 version
- End of 2023, beta of next major version
We are still working on bugfixing the 10 version. This last brought substantial changes, especially on the assistance part.
But we aim to work on the incoming yearly results fully on the latest version.
In a few weeks we will launch the first beta version of GLPI 10.
We are working on the last technical elements and preparing the release of compatible plugins on the Marketplace.
One of the biggest news of this version is a major overhaul of the interface and the user experience. The latest redesign since version 0.90 was done in October 2015.
Based on tabler, Bootstrap 5 et Twig, it brings many visual changes.
The integration of these standard libraries will make it easier to develop new interfaces and above all brings a "responsive" display mode that is easier to maintain.
Here are some screenshots to give you an overview of the upcoming changes.
Beyond the change in design, we are making a number of user experience improvements, here is the list of key points:
As you have noticed on the previous screenshots, GLPI now offers by default a layout with a vertical menu. It is still possible to switch to a layout similar to previous versions (named Horizontal) in user settings.
In the new layout it is possible to collapse the menu to have a compact display.
Available since version 9.2 the "Go to" feature which allows a quick search of a menu is now highlighted and can be discovered on top of the menu.
The park equipment now has a panel on their right side where you can click on the images attached.
The "saved search" panel now integrated into GLPI design.
You can set it floating, or pinned to pages (to be kept permanently (even after browsing)).
Pinning is done page by page, e.g. a panel pinned to "tickets" will not be pinned to computers.
Note that now you can find it in the first tab, the saved searches corresponding to the type of object: list of tickets will be displayed according to priority of saved searches.
Second tab lists all other searches concerning other types of objects.
As the panel is now contextual to the type of object presented, you can access it via an icon named "Lists" placed next to the breadcrumb trail.
It is now possible to deactivate the display of the search engine.
You can navigate in GLPI only using saved searches!
The search engine display is now launched in "AJAX" mode. A loading icon is displayed when a search is launched, page changes or sorting is in process. Once new results are available, only the content is replaced and not the entire page.
With a "ctrl" you can add several sorting modes to the columns of your search results.
Example: sort by "Name" and by "Modification date".
The main element form now displays a panel on the right displaying the images associated with the corresponding model.
These images could be previously accessed only in the display part of data center racks, now they are available everywhere.
Display and use of ITIL objects (Tickets, Problems and Changes) are thoroughly reviewed.
Many changes were made:
With the arrival of new libraries tabler et Bootstrap 5, it is now much easier to create and modify GLPI palletes.
Here is an example of one corresponding to the capture below:
2 new dark palettes: